


Bullseye Helpful Hints
Complied by Phil Nutting, George Lucas, Cape Cod Shipbuilding, et. al.
The following is a collection of helpful hints gathered from many years of sailing and trailing boats. I hope these prove helpful. I’ll add more as I think of them. Feel free to send in your tips to the Bullseye Secretary.
These tips and hints are gathered from Bullseye owners to share with others, but the Bullseye Association accepts no liability for the content of this page, or for the consequences of any actions taken on the basis of the information provided.
Tips for Winter Storage
Running Rigging Changes
Tips for Springtime Preparations
- Line Types
- Air Tanks
- Testing the Air Tanks
- The Case for Buoyancy Bags
- Installation Tips for Adding Anti-Swamp Floatation, and Latest Buoyancy Test Experience
- Put The Drill Down and Think It Through First!
- Yellow stains in Gel Coat
- Those black spots on topsides and deck
- Rubbing Compound and Wax
- Polishing Cloths
- Trailer setup for proper tongue weight
- Trailer preparation for longer rides
- Mast and Boom Trailing Supports
- Preparing a smooth bottom for racing
- Preventing Boot-top grass
- Bright Work Preparation
- Mooring Inspection
- Sail Measurement
Tips for Winter Storage
For boats stored outside, put some RV antifreeze in the well to prevent freezing. This antifreeze is the kind used in drinking water systems of Recreational Vehicle during winter storage. It won’t stain the boat and is not harmful to the environment. It can be simply pumped out and washed away with water in the spring.
Note: DON’T use regular automotive antifreeze, it is poisonous and terrible for the environment.
Tarps and Covers
For boats stored outside with tarps as covers. Check the cover during the winter months for damage and sag. Keep the cover tight. If it traps snow it can rip and fill the boat with ice and water. I like to use a high ridge pole to keep the angle of slope as steep as possible so most snow slides off.
To clean all the miscellaneous lines which get salty and dirty during a season of sailing, place the coiled lines in the top rack of the dish washer and run as a normal load. I wouldn't recommend washing dishes in the same load. Those lines really get filthy. Once they are washed, hang them out to dry and then place them in a box or bag and put in a dry place until spring. This would be a great time to inspect and repair any lines which need to be replaced, re-spliced or re-served.
Cleaning Sails
To rinse and clean sails before putting them away, try filling the tub with warm water and some Snowy Flakes, Ivory Snow or Woolite. This will gently wash the sails and remove the salt. Rinse well and hangout to dry. Once the sails are dry, fold the sails and put them away until spring. This would be a good time to inspect the sails for any needed repair. Sail Lofts are usually less busy in the winter months and can have your sails repaired before that first warm spring day when everyone else wakes up and remembers they need their sails repaired.
Canvas boat covers, life jackets, seat cushions, etc. can be treated as sails and be cleaned and inspected prior to packing away for the winter.
Safety Equipment
Take this time of cleaning and packing to check to see if you have the recommended safety equipment. Maybe it is time to replace some items. Making a list now will give you an opportunity to shop the Marine Chandlery sales in the coming months before the next season starts.
When was the last time all the fittings of the mast, boom and shrouds were checked for wear? When putting away my mast I found that one of my shrouds will need to be replaced next year because the wire strands are breaking at the turnbuckle.
When replacing the shroud, adjust the length of the new shroud by matching the new shroud to the one being replaced. This will save a lot of time adjusting and tuning your standing rigging before the next race or sailing outing. An untuned rig can give odd and different sailing characteristics between port and starboard tacks.
Anchor Holding Power
If the chain on your anchor is less than six feet long, I'd suggest you change it to at least six feet. I prefer twelve feet of chain as it gives more holding power even with a small Danforth anchor. The idea of the longer chain is to keep the anchor biting into the bottom without lifting the shank. Make sure you have about 100 feet of anchor rhode, again to help with the holding power of the anchor. If too short a line is used it simply lifts the anchor up with each bounce of the boat.
Consider jacking up the trailer and supporting the weight on three or four jack stands. This will help the tires last longer and to keep the tires from "flat spotting" due to sitting for six months in the same position during cold temperatures. The jack stands should have a sheet of 3/4" plywood, about 18" square, placed under them if the trailer is parked on grass or dirt to prevent the jack stands from sinking into the ground.
If you have a trailer that you must submerge to launch or haul your boat, consider repacking the wheel bearings before closing up for the winter.
A coating of Vaseline on light bulb bases will help prevent corrosion, especially if you submerge your trailer for launching or hauling.
Running Rigging Changes


If you race and you feel that some of your lines are hard to handle, consider changing some of your running rigging to Harken® blocks. I found that with the conversion to Harken® blocks at all locations I no longer needed winches and the sails were easier to adjust especially in those really light air days.
For a look at rigging variations, check out the Standard Bullseye Rig and my Modified Bullseye Rig. I’ve seen many more combinations during my years of sailing and racing Bullseyes. Each one has its merits, I just haven’t tried them all.
Download and print the Standard Bullseye Rig PDF file, then download and print the Modified Bullseye Rig PDF file.
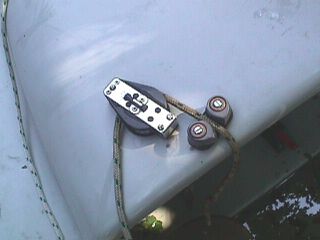
Here are two photos of midship jib blocks and cleats as modified on sail number 696. The cleats are designed by "Design Studio" in England. (On a recent shopping trip to my local BoatUS store I found these on the shelf for about $24.00 each.) Harken makes a similar setup (see the bottom right picture), but using an upward release rather than a sideways pull to release. The sideways release works very well in all angles of heeling whereas the upwards release are a problem in heavy air and your sitting on the weather rail and need to quickly release the jib sheet. To quote the now often used phrase "been there, done that" and I didn't like it.
The top picture is of the port side as viewed from outboard and the bottom picture is as viewed from the port seat.
A Harken setup mounted on a custom stainless steel barcket on the starbord side (right picture) as viewed from outboard of sail number 291.
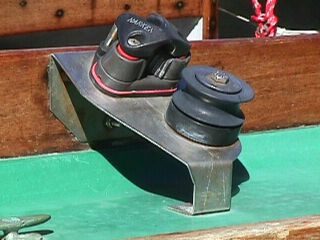
Modified Rigging, Spinnaker Blocks
The photo left shows the spinnaker blocks which were mounted on the cuddy in place of the old winches. Some people have used this configuration for jib blocks. With the spinnaker sheets setup like this you can control the spinnaker like a team of horses and be looking forward without getting in the skippers way. On a windy day it can feel like a team of unruly horses.
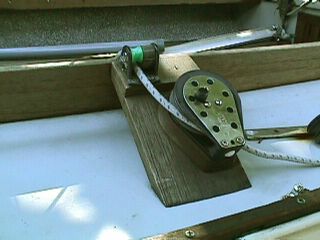
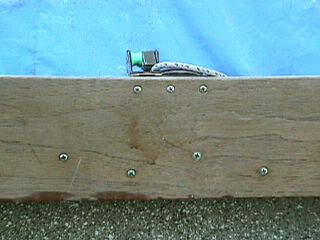
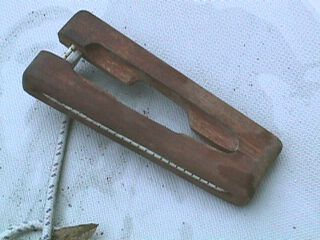
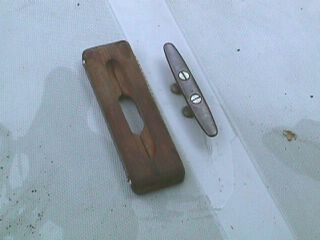
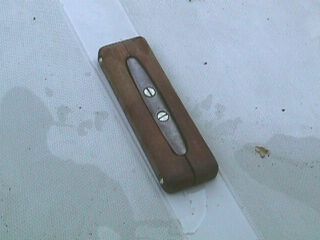
Bow Cleat Modifications for racing.
Ever had your jib sheets get caught on the bow cleat during the most important race of the season? Well, it happened once to many times, so here is a fix. Two blocks of wood (these are mahogany) which have been shaped to fit around the bow cleat and held together with a piece of bungee cord. This also works well on a stern cleat.
Tips for Springtime Preparations
Consider braided lines instead of the traditional twisted lines. Many of the braided lines are available in many colors which is a great way to keep track of which line is which during racing.
Air Tanks
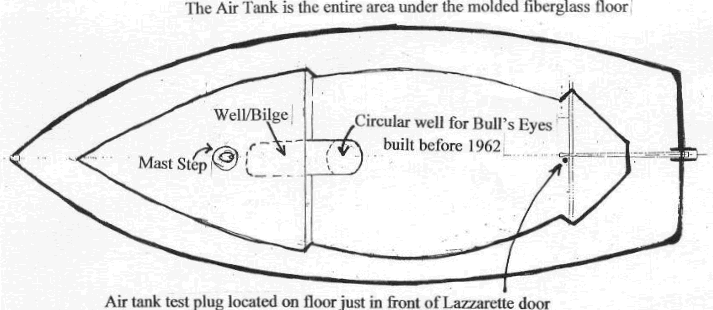
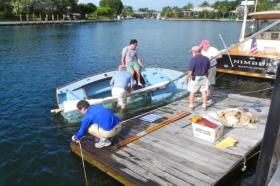
When was the last time you checked the air tank under the cockpit sole for water? I don't know where it comes from, but what a difference it makes in sailing performance and ease of launching when the tank in dry. Most boats have a small threaded plug just aft of the mast step. A small tube can be inserted and connected to a small pump to empty this tank, but it can be a fussy and frustrating process. An effective solution, but not recommended by Cape Cod Shipbuilding, is to cut in large (6 inch) access holes with screw in covers. These can greatly improve the ability to empty the air tank, but if not sealed correctly can defeat the original purpose of the air tank, emergency floatation. Now you see why Cape Cod Shipbuilding doesn't recommend this method. Note: During the 2003 Nationals in Marion a Bullseye sank in a matter of minutes due to a leaky air tank.
As a side note, while prepping my boat for the winter this year, I open my access holes and spent the next ten minutes pumping out water that had gotten under the deck while the boat was sitting in the yard waiting for the winter cover. The air tanks were almost completely filled with water. Now you know why Cape Cod Shipbuilding does not recommend cutting holes in the air tanks.
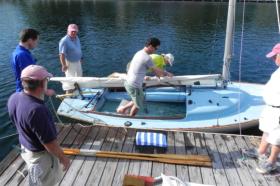
If you notice your boat sitting low in the water while or you hear water sloshing around when the well is dry, she quite possibly has an air tank leak. The air tank is the only thing preventing the boat from sinking when swamped. It is incredibly important to assure that the air tanks are tight for safety sake. If you believe that your boat has an air tank leak, it should be hauled immediately and repaired. The main air tank on the Bull’s Eye is under the molded floor. Bull’s Eyes with an oval well also have a smaller tank in the bow. These air tanks need to be tested every season and also any time there is a collision or damage. Generally leaks occur when water is allowed to gather in the well and freeze. This causes cracks in the well which allow water to seep into the air tank. If you find one leak, it should be assumed that there are multiple leaks.
See PDF instructions for Testing the Air Tanks.
The Case for Buoyancy Bags - By George Lucas 3/7/14
As a result of a sinking incident, Card Sound Sailing club has experimented with adding buoyancy bags to find the most effective and economical design. The test results have been consistent and rewarding. We added air bags under the aft deck, under the seats, and forward of the mast. We forced heeling by pulling on halyards from the dock to an angle allowing water to flow in and out. When the force was released, the Bullseye immediately righted and floated stable, high enough for two crew to bail from the cockpit and walk on fore or aft decks. The cockpit water was just at or under seat-level and the outside freeboard was about 10 inches. See “Bullseye sinking attempt at Ocean Reef” for YouTube video of the first test.
CSSC tested standard Optimist Dingy floatation bags. They are widely available, built to rugged Optimist Class specs and quite reasonably priced. Eight or nine bags will work: one or two aft, four lashed under seats, and three forward of the mast lashed to the floor. The results were similar to those above.
CSSC also tested opening the inspection port after swamping to simulate leaking air tanks. Some of the water in the cockpit drained, filling the air-tank, lowering the amount in the cockpit, but still providing about the same 10 inches of freeboard and a giving a stable platform from which to bail or go on deck. With airbags in place, a lesser amount of water is taken into the cockpit, allowing for the buoyancy of the hull to perform. It proved that added buoyancy bags add safety even in a boat with undiscovered leaks in the air-tanks. Normally the boat with air bags could be bailed leaving the boat safe to continue the day’s racing or sail home unassisted.
One supplier, Colie Sails in N.J., is offering a kit with 9 bags and all hardware for installation. Details on this offer and tips on installing the bags will be found on the BCA website and with this link, http://coliesail.com/bullseye-buoyancy-kit.html

Installation Tips for Adding Anti-Swamp Floatation, and Latest Buoyancy Test Experience (April 22, 2014)
CSSC successfully tested adding standard Optimist Dingy floatation bags to prevent swamping if hit by an extreme gust or just a strong puff with crew caught to leeward.
When the bags are installed, with a maximum heel (simulated by pulling jib halyard over to seawall), water flowing in and out; with the halyards released in test (or the sheets uncleated in real life), the boat springs back upright. The water in the cockpit is at about seat level or below, not swamped, and can be bailed out while continuing to sail. The key is that the bags both limit the amount of water coming in, and at the same time, the side bags keep the strong righting moment that otherwise is lost as the side of the boat continues to slip down under water without bags.
The bags are widely available, built to rugged Optimist Class specs, and quite reasonably priced. Eight or nine bags will work: one or two under aft deck free, two lashed under each seat or behind the seats under the side decks, and three forward of the mast lashed to the floor or held down by other means. All bags and the hardware and straps are available for a total of under $400
List of parts for the installation: (in addition to the 9 bags or similar alternative floatation)
- 8 straps, 68 in. each
- 8 tangs, sized to allow strap to fit between bolt holes
- 16 ss oval head or flat head bolts, 1 1/2 inches long
- 16 ss lock nuts
- 16 ss finish washers
- Parts above for 4 under or behind seat bags of about 30’ x 10”dia.
- 4 eye straps (that take a #10 screw)
- 8 ss #10 pan head -1/2 inch screws
- 12 ft. of 1/4-inch line to lash the 3 fwd bags down to the eye straps
(Parts above for forward flotation)
One supplier, Colie Sails in N.J., is offering a kit with 9 bags and all hardware for installation with this link, http://coliesail.com/bullseye-buoyancy-kit.html
Tools needed - Phillips head screwdriver, drill, 1/8” and 3/16” drill bits, 3/8” wrench or pliers, tape measure. Bags can be orally inflated or better with small air pump.
Note: Other methods could do the same job; such as using foam blocks covered by a canvas shop, and epoxying the hold-downs. For under the aft deck, rather than just putting in two bags, (no straps necessary), sealing the drain holes and dogging a removable solid hatch could be fashioned. All options are allowed, but the bags with screws and bolts work, have been tested, leave enough room, and can be bought and installed right now, in less than one hour.
Here are tips from what we learned in the tests:
Four under-seat bags fit fine for most seats, (two per side), but without straps when a partially swamped boat is heeled a bit, the bags shoot out along the floor (which is temporarily “up”). Thus strapping bags to under side decks, near the rails, or to the lower part of the coaming, bolting thru wood and glass, was necessary and easy. Also note that the seats should be firmly fastened down (which is usually the case) when mounting under seats.
Some seats have under shelves, drawers, or are too low for bags. We recently tested installing the bags behind the seats, up under the side decks, also strapped as before. Having them up higher like this, they perform almost as well, so this is an option. With bags up under deck, the righting moment is still good, but the boat is somewhat less stable when bailing. Even then, a crew can walk around the decks without causing overflow.
We tested leaving out the forward bags, just having the side/seat bags and under aft deck (because that is easy and the low point of decks). This is better than no added floatation, but not advised. More water flows in, the righting force is less, and when righted, the water flows forward putting the bow only a few inches above water, the bailing is harder to reach, and the boat less stable.
The bags should be kept inflated slightly less than firm, as they expand with heat and even when soft, they are still big enough. By using these nine bags, there is a margin of safety if one or even two might get a rare puncture by under-deck sharps. If a bag is punctured during near capsize, the bag will still hold air long enough to work during that brief period. If punctured in normal sailing, it becomes obvious and can usually be resealed with a cross of waterproof shrink-wrap tape.
Installation tools: Drill, 1/8” and 3/16” drill bits, screw driver with phillips-head, and 3/8” wrench or pliers, and a tape measure.
The exact placement of the seat bag tangs and the forward floor eye straps is not critical within a range of over 2 inches, but the distance between each pair of holes is important to get fasteners to match the hardware. Since a drill point sometimes “walks” before biting in, good practice is to first drill just one of each pair of holes, then fasten one screw (or temporarily insert the bolt in tang on deck), then use the hardware to guide the drill for the second hole.
- ADD 8 tangs, bolted under side decks just in from the rail, OR as an alternative, bolt thru the lower edge of the coaming and backing fiberglass, with flat or oval- headed bolts and finish washers with lock nuts under tangs.
For each side, measure back about six inches from the end of each seat, and drill first holes in the deck (or coaming) using the 3/8” drill. Using tang with loose bolt as a guide, drill second holes. Measure about 21” toward middle of seats and repeat drilling the other four tang holes. Mount tangs behind and turn up the nuts with 3/8” wrench.
Leave tangs loose enough to loop the two ends of 68” web straps under tang from outboard-in direction and temporarily knot ends. If using the coaming position, the straps go behind seats and need trimming or wrapping back. When the inflated bags are in place, firm up the straps and tighten bolts. - ADD two bags in the lazarette, under the aft deck, without straps. Partially inflate and finish inflation when thru the opening. This still leaves some room for your jacket, ditty bag, or water. We tried using only one bag, which floated stern OK, but the extra one adds stability in the “low end” and adds a safety measure.
- ADD at least three bags forward of the mast, and lightly lash them to the floor. We used 4 eye straps, each with two #10 x 1/2” pan head screws using 1/8” pilot drill. These were located on outside of floor with the aft ones about 6” forward of mast and the forward ones about 10” forward of those two. The #10 screws had enough holding power, and you might use 4200 caulk for added air tank integrity though probably not necessary. A light line is easiest to lash the after ends of the bags down to these four points. Extra forward bags, total of six, were used in one test, not lashed, and that worked fine but restricted the space under deck for gear and proved to be more floatation than needed.
G B Lucas, April 22, 2014
 Bags behind seat, under side decks
 Airbag under seat
 Four lashing eyes forward
 Three bags lashed down forward
Put The Drill Down and Think It Through First!
(More information pertaining to the “measure twice cut once” adage.)
Let me start by stating the fact that it is never a good idea to drill into something that is supposed to float, and if one feels one really wants to drill into a boat, one must familiarize oneself with all the possible engineering consequences. The boat builder/designer would know this information best and should be contacted to see if the holes one might be drilling are recommended. One should also ask oneself:
- How much benefit will really be gained or lost by installing this fixture?
- What is the purpose of the fixture and has it already been addressed in some other way?
- Will it compromise anything else and how much?
- What is the structural integrity of the fixture being installed (i.e. how well and reliably will the fixture be able to perform its proposed function)?
Assuming one still feels one must drill into a boat, there are some very basic, yet very specific and important installation and maintenance guidelines that absolutely must be followed and questions one should be concerned about:
- What is behind what you are going to drill into (i.e. the ocean or lake, safety air buoyancy tanks, electrical wiring, plumbing hoses for fuel, water, or waste,)?
- Could you be compromising the structural integrity of the boat (i.e. safety/legal repercussions!)?
Assuming one is still determined to put holes in their boat, here are some more questions and decisions one will want to ask and make:
- What materials are you going to drill into (i.e. fiberglass, wood, plastic, metal, foam, voids, etc.)?
- What grade of fasteners should you use (i.e. 316 or 304 stainless steel, aluminum, brass, bronze, steel, plastic, or an adhesive)? Dissimilar metals are more likely to corrode and react negatively with each other and shouldn’t be mix matched. Also keep in mind that when drilling and self-tapping screws into gel coat, fiberglass, etc., chips and cracks can occur, so be very aware of compromising what is being screwed into or you could end up with what is a serious problem.
- What size drill bit should be used for the fastener and the material it be going into?
- How long is this installation supposed to last (i.e. temporary, a certain number of years, or the life of the vessel)?
- How likely will the area be exposed to water/liquids, and are there materials that could rot, corrode or become compromised due to this exposure? Wood cored areas are very susceptible to getting wet and weakening and if you live in an area that gets below freezing temperatures, those wet areas turn to ice and can cause unspeakable destruction to a boat. Just keep in mind, if water can get in ... it will!
- What type of bedding (sealant/adhesive) should be used? Bedding compounds range from less permanent to more permanent with better to worse sealing and adhering capabilities. There are many different types and chemically based versions depending on what materials they will be used on (Important! Check compatibility and surface preparation on the products label). One should make sure sealing/adhering surfaces are dirt and oil free. Also be sure that any and all old sealant/adhesive is cleaned off the fastening area (believe it or not, most new silicone doesn’t like to stick to old, cured silicone even though they are the same product).
- How often should the fastener and component be checked/inspected and re-bedded? Any place there is a fitting fastened to a vessel, it will need to be removed, checked/inspected for integrity, cleaned and re-bedded. The area may even need to repaired or replaced.
- Last but not least one should now paint their boat yellow and name it “Swiss Cheese”.
- This has been my 2 cents ... Thanks for reading and Good luck!
-Jed Hoffer
If you find that your Gel Coat is turning yellow at the water line, look for a product called Y-10® at your local marine store or chandlery. It is a blue jelly goo you just brush on, wait a while and wash off with soapy water. Amazing stuff!
And from one of our readers;
“I note among the useful tips on your web page a recommendation of a product called Y-10 for removing yellow stains from the gelcoat around the water line. No doubt it is a fine product and does the job, but for several years I have followed the suggestion of one of my fisherman friends in downeast Maine and have used a product that is very effective, readily available, and probably cheaper than Y-10. You won’t find it in your yacht chandlery. But go to the local supermarket and pick up a bottle of Lysol Toilet Bowl Cleaner. Put it on with a damp sponge or rag, leave it for five minutes and wipe it off with a wet sponge or rag. As with any powerful cleaner, you might want to wear rubber gloves, and you should be careful not to get it in your eyes. I use it on my Bridges Point 24. It works.” sent in by Kent Mullikin
Those black spots on topsides and deck
I tried an experiment and was amazed at the results. I used Sun Light® or Cascade® dishwasher detergent mixed in a strong warm water solution and washed the topsides and presto, all the little black spots were gone without having to scrub real hard. For the white rubber rub strip use the same mixture with a ScotchBrite® pad and rub gently and remove all the scum instantly.
Rubbing Compound and Wax
The Mothers® brand of automotive compounds and waxes seem to work well. I used the compound and wax liquid products and got rid of a lot of small dark marks on the gel-coat and at the same time put on a coating of wax.
Looking through the rag box for just the right polishing cloth? Save old t-shirts (the plain ones without silk-screened logos, colored shirts are OK), velour shirts/pants (remember those from the ’70s?), cloth baby diapers, old towels and dare I suggest old jockey undershorts ("whitey-tighties" as my daughter calls them).
Trailer setup for proper tongue weight
A properly adjusted boat and trailer combination should produce only about 75 to 100 pounds of downward force on your trailer hitch. I have found that if I place the center lifting eye approximately centered over the axle of the trailer I can keep the tongue weight in the desired range. It may require adjustment of the jackscrews on the trailer but it will be well worth it each time you connect or un-connect the trailer, not to mention the ease of towing.
Trailer preparation for longer rides
If your trailer is like mine, consider buying a spare tire and rim. My trailer uses a rim which most tire machines cannot hold. If you are traveling on a weekend and have a trailer flat you may not find a garage that can help, let a lone be open. My spare rim cost $26 a few years ago and I used an old tire which won't pass state inspection but holds air and will allow me to continue my trip. While you’re at it, do you have the necessary jack and lug nut wrench to change that flat tire? Even if you are not physically able to change it yourself, at least you have the necessary equipment when help arrives.
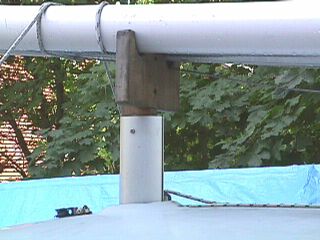
Mast and Boom Trailing Supports
One problem of trailing your boat to regattas is the method of tying down the mast and boom for the long ride. Some folks use the boom crutch, but these don't support the weight of a mast well during a long ride. Other options are placing boat cushions on the cuddy and aft deck and then tying every thing down. These methods work, but each has a disadvantage. Below are pictures of custom supports made for long distance trailing. The mast support started life as a section of Zepher mast extrusion (scrap purchased from Zepher Spars) with pieces of mahogany shaped to fit into the extrusion with notches cut to support the bast and boom. The aft support is again mahogany with similar notches for the mast and boom and the butt end is shaped to fit into the boom crutch plate on the aft deck. One thing to keep in mind is, what is your tow vehicle. If you use a pickup truck with a cap you may want to make the aft support short enough so the mast clears the top of the truck cap. Don’t forget the red flag on the trailing end of the mast.
The tie down scheme for trailing is as follows.
Forward from bow cleat to one jib deadeye, up and around mast/boom, down to other jib deadeye and back to bow cleat. For added “anti-bounce” I tie a line from the forward shroud mounting up to the mast to prevent whipping up and down from big bumps.
Aft from jib cleat to rear spinnaker deck block, up and around mast/boom, down to other rear spinnaker block, then forward to other jib cleat.

Preparing a smooth bottom for racing
Getting the smoothest possible bottom can only help when racing. Over the years I have worked hard at putting on the thinnest layer of bottom paint in the spring, but what really makes a difference is wet sanding the entire bottom. The best way to do this is to suspend the boat via its lifting eye/sling and fair out all the bumps and overlap areas from painting around the trailer/cradle stanchions. Once this is complete, rinse and dry the hull and inspect it for areas which still need attention. Once it is fully ready for paint, break out the brush and paint and paint the entire bottom while suspended out of the trailer/cradle. Make sure that you brush out the paint and paint in the direction of the water flow.
An experiment I tried this year (because I was really late in launching... just in time for the Nationals) was to use a Scotchbrite® pad and water to scrub the bottom and not bother to paint the bottom. This removed the very top skin of paint and exposed the copper from the anti-fouling paint. Hmmm? I wonder how this will retard plant and scum growth. I’ll let you know in October when we haul out.
October has come and gone. The boat is finally under winter cover. On haul-out day I was pleased with the very small amount of scum growth on the hull. However I did not give the full test of a complete sailing season. Generally in a full season the boat is hauled several times to remove the scum to keep the boat clean for racing, especially before the Nationals.
Over the years many people have eliminated the boot stripe from their boat preparation for two reasons, it means another color paint to cut (mask) in and dry as well as having grass and scum grow on the boot stripe. I eliminated this problem by using anti-fouling paint for my boot stripe. There is something pretty about the contrasting color of a boot stripe. I was lucky enough to find some white anti-fouling paint which I could then tint (using standard tinting colors from a local paint and wallpaper store) to my desired color of light blue.
Bright work is always a problem to maintain. I used to use Teak Oil on my bright work until I realized that the seat of my sailing shorts were getting black after each day of sailing. (Not very attractive when walking home.) I have switched to using a product called "Deks Olje®." This does not turn your cloths black and seems to do an excellent job of protecting the wood. Two words of caution, try not to get it on the fiberglass as it will discolor it and clean out the brush as soon as your done. The brush will turn rock hard if not cleaned out.
An alternative, although probably not recommended by the products manufacturer, is Thompsons Waterproof® (NOT Thompsons WaterSeal®!... this stuff is paraffin based and actually attracts dirt like a magnet.) I discovered Thompsons Waterproof® after building my porch/deck behind the house. It smells and works just like Deks Olje®. I put two coats on the porch decking in late summer and now the water beads up and runs off. Wow!
For those of you looking for Deks-Olje, here is the manufacturer’s information. It should be available at marine supply stores. If not I have listed the manufacturer’s information below.
The Flood Company
PO Box 2535
Hudson, Ohio 44236-0035
phone: 800-321-3444
fax: 330-650-1453
www.floodco.com
There are two products Deks-Olje #1 “Clear Wood Finish” and Deks-Olje #2 “Clear Wood Finish”.
Before you put the boat on the mooring, when was the last time you inspected all the chain and lines of your mooring gear. Several years ago I got a call at midnight from the local police that my boat was heading for the rocks. I had used a less expensive traditional twisted line which I had spliced onto the thimble. It had managed to unsplice itself! My line now consists of a braided line which won’t come unspliced. Consider a nylon (plastic) thimble for the connection to the chain. My galvanized thimble has rusted away to nothing and the line is starting to wear.
It is recommended that new sails be measured, even if there is no immediate plan to compete, at the first possible Nationals after delivery to reduce the possibility of sail stretch causing the sail to be considered out of specification at future Nationals competitions. Let’s face it, sails change shape after they have been used for a season. Now sail for three or four seasons and you have some major changes in sail dimensions. If you were to take these “old” sails to a Nationals competition, assuming they had never been measured at a Nationals, they would most likely measure out of specification. Don’t whine to your sailmaker! Sails are considered consumable items just like brakes, mufflers, tires and motor oil on a car. They stretch and wear out. The solution is to find a way to get your new sails measured and marked at a Nationals before you take them out in a heavy gale. Then if the Nationals happen to be in your “backyard” you can enter and not have to get your sails recut prior to being able to race.
Logged in email account: